Changing Floor Plan Heights In Revit
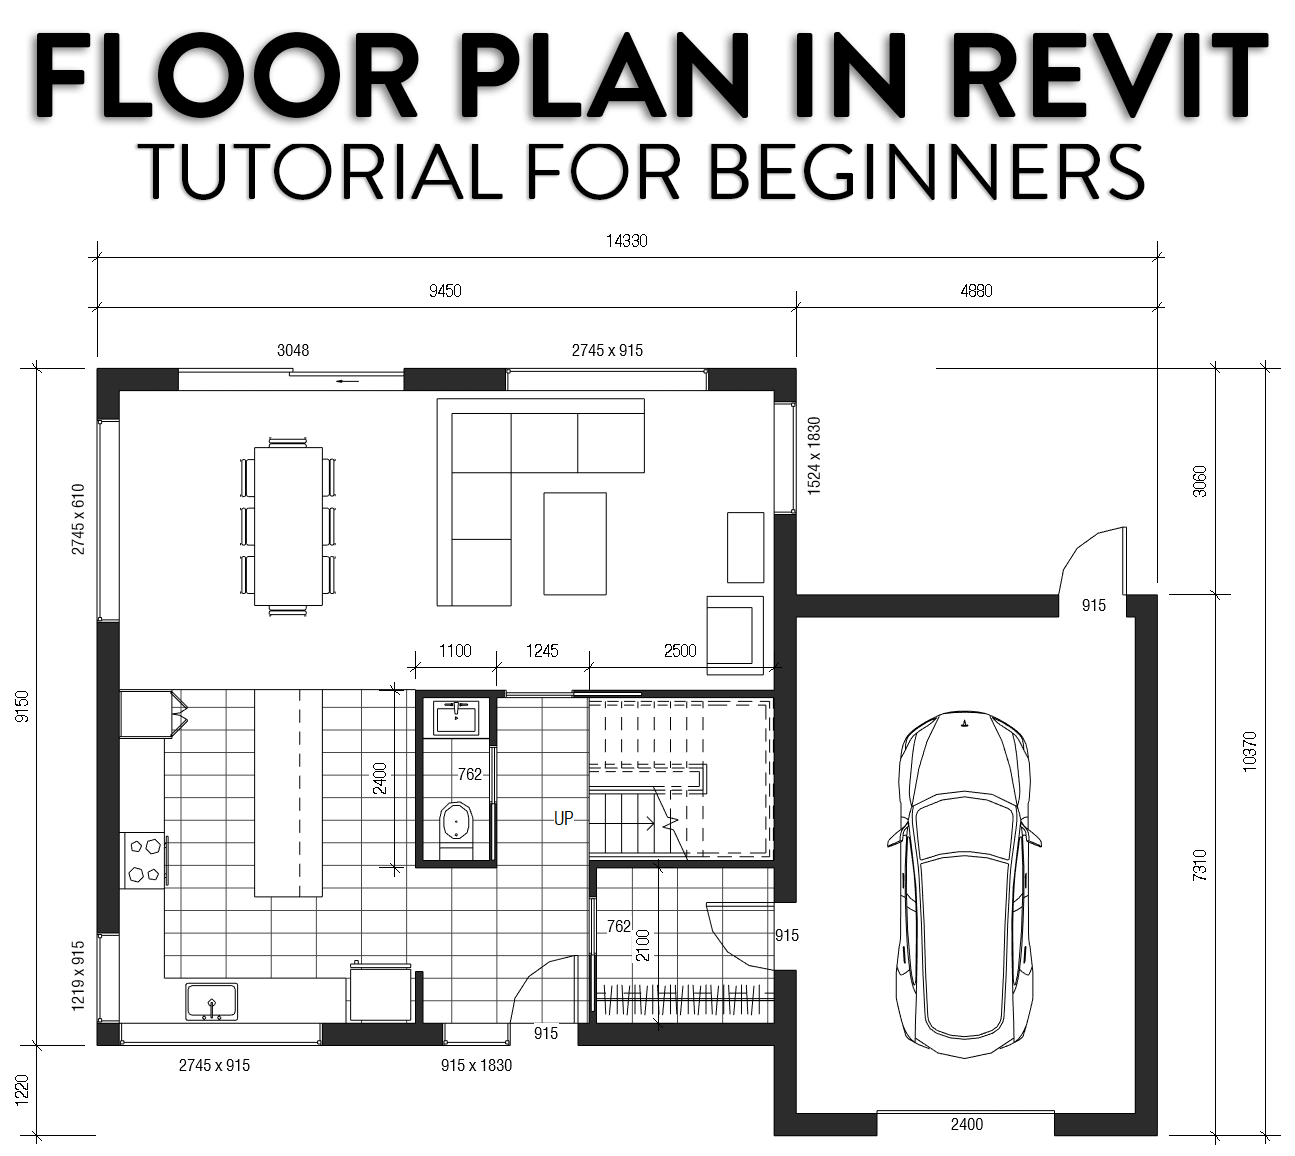
14 Beginner Tips To Create A Floor Plan In Revit Revit Pure

Solved Revit Floor Plan Showing Objects From Floor Above Autodesk Community Revit Products

How To Set The Height Of Each Floor Autodesk Community Revit Products

Beginner Revit Tutorial 2d To 3d Floor Plan Part 2 Youtube

Revit 2016 Project B 17 Adding Kitchen Casework Or Joinery Revit Architecture Joinery Projects
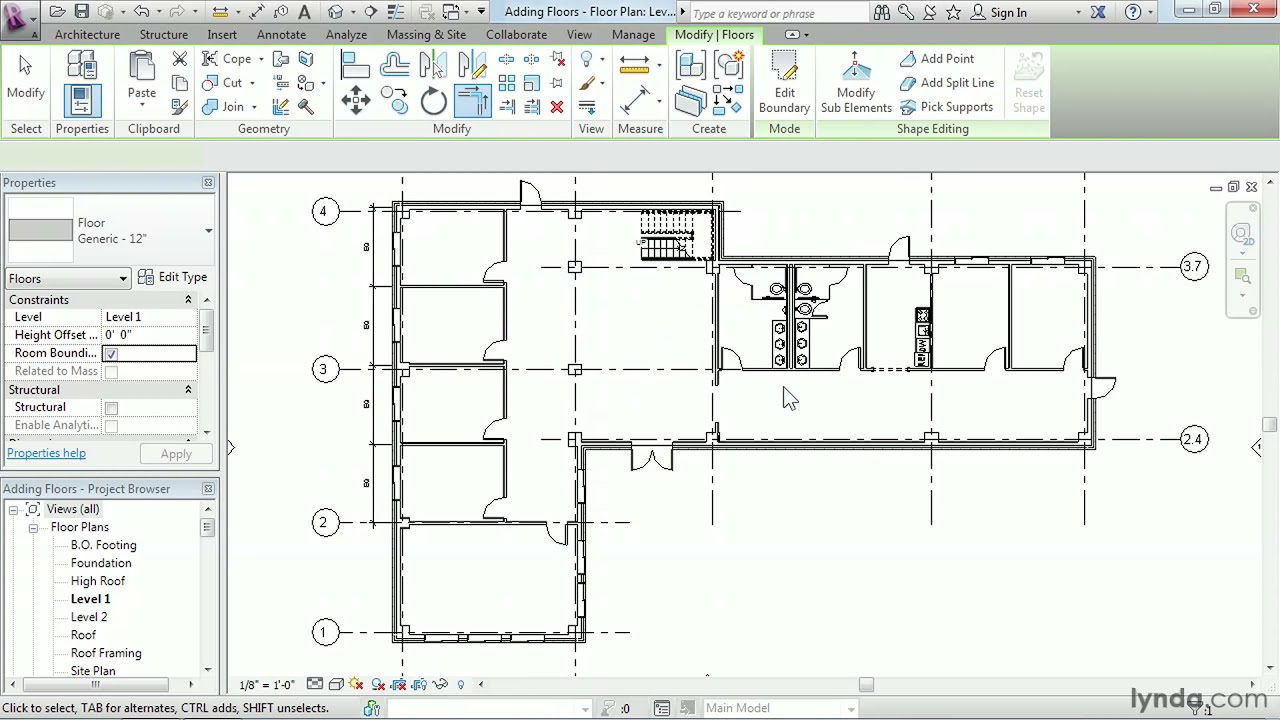
Revit Architecture How To Work With Floors Lynda Com Tutorial Youtube
So i need the cut plane at the elevation more than 1700.
Changing floor plan heights in revit. Use the depth clipping parameter to display parts of a model below the cut plane. Every plan view has a property called view range also known as a visible range. Set a level and a height offset for each of these parameter. But when you open the floor plan you can t see the windows.
The cut plane is a plane that determines at what height certain. About the view range. Select the ground floor level and enter the known height of elevation in the dialogue box in the elevation field usually finished floor level or structural slab level or maybe a site datum all the levels will change in accordance with the new specified level. The top and bottom clip planes represent the topmost and bottommost portion of the view range.
Everything between the cut plane and the bottom will display in light lines. If you only want the wall visible in the plan view as it appears in the view range of level 3 you can clip the wall from view using the depth clipping parameter. The reason why we can t see it is that they are placed above the cut plane of the plan s view range. Same tool can be used with grid.
The view range is a set of horizontal planes that control object visibility and display in the view. Everything cut by the pink line like in the image below will display in thick lines. You activate this feature using the depth clipping parameter for the plan view. In a floor plan view the key parameters are cut plane and bottom.
The horizontal planes are top cut plane and bottom. The back clip plane is defined by the view depth parameter which is.

Jochesxp I Will Draw Your Floor Plan Elevations Roof Plan Or Sections For 25 On Fiverr Com Floor Plans House Plans Autocad

Revit To Indesign Indesign Diagram Image
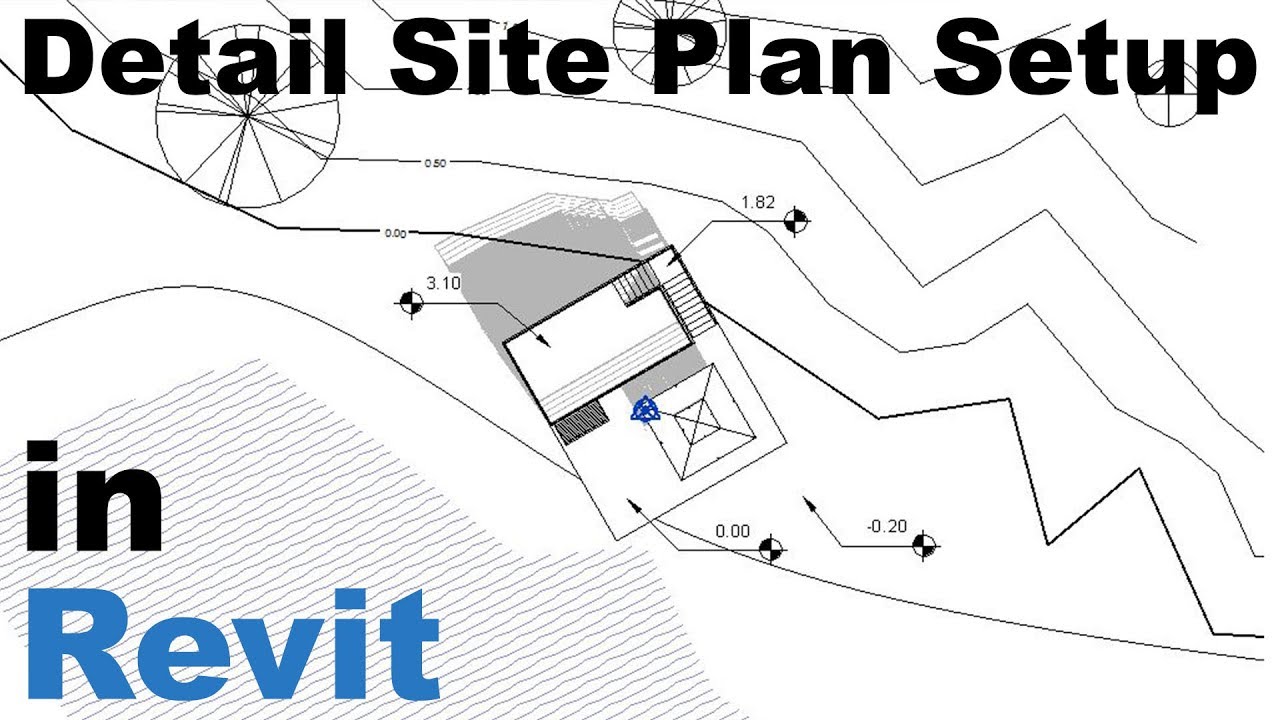
Detailed Site Plan Setup In Revit Tutorial Youtube
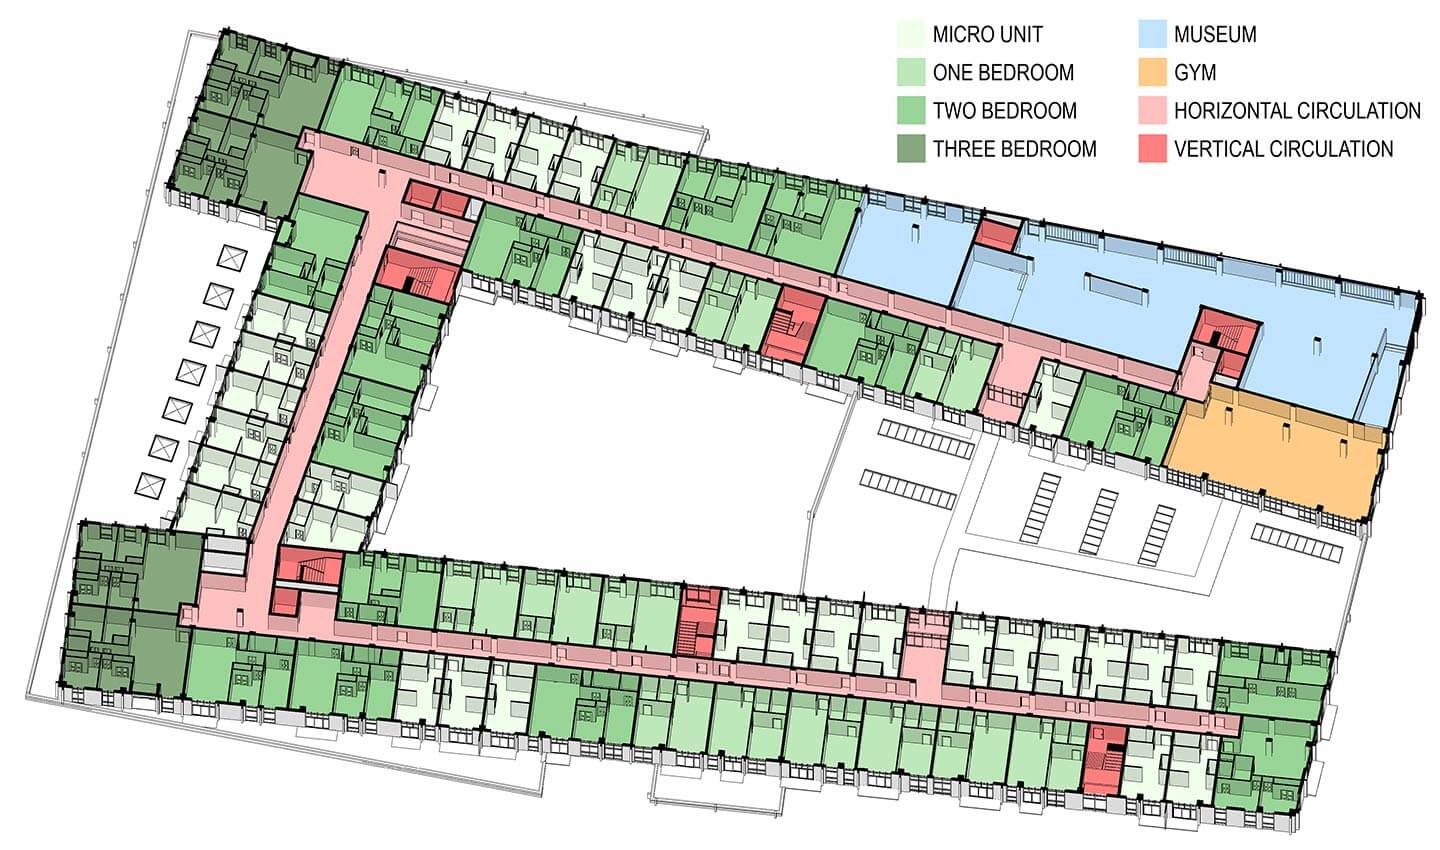
Creating Axonometric Floor Plans In Revit Dylan Brown Designs

Glass Partition Construction Drawing Glass Partition Construction Drawings Ceiling Plan
Video Add A Color Scheme To A View Revit Lt 2019 Autodesk Knowledge Network

Find Mirrored Elements Change

05 Revit Animation Setup Part 2 Youtube Revit Architecture Revit Tutorial Architecture

Generate Color Legend For Ceiling Heights Revit Dynamo Ceiling Plan Generation Parametric Architecture
Revit Tutorial 3d Floor Plan Youtube

Solved Walls Are Not Visible In Floor Plan Autodesk Community Revit Products

Nathaniel Richards Revit Sample Architecture Details Architectural Design House Plans Revit Architecture

Revit Creating Arcs In Property Lines Revit Architecture Arc Lines

Use A Schedule To Edit The Model In Revit How To Plan Design Model

Multi Piece Curbed 30 X 30 X 80 Shower Curbed Threshold 4 Curb Height 4lbs3030 V2 Bestbath Small Bathroom Floor Plans Master Bathroom Layout Bathroom Floor Plans

View Range Revit Products Autodesk Knowledge Network

3d Floor Plan Developed For Project Architecture Project Facade Architecture

Realistic Materials In Revit Enscape Tutorial Revit Architecture Kitchen Decor Images Dining Room Design
Https Encrypted Tbn0 Gstatic Com Images Q Tbn 3aand9gcsp7vd96cqsggkhyqyhy6csxdlmsryuxrzrwtrjvwy60ngmf7q6 Usqp Cau

Autodesk Revit View Scales Bimscape

Construction Documents Construction Documents How To Plan Floor Plans

Pin On A D Computational Design

Casa Simon Simon S House On Behance Autocad Revit House Design Luxury Design

Sketchup Home Plan 12x14m 3 Story House With 4 Bedrooms House Plans Story House 4 Bedroom House Plans

5 Bedroom House Floor Plan Instant Download Luxury Floor Etsy In 2020 Luxury Floor Plans House Flooring House Floor Plans

Revit Add Ons Free Elk Toolbox For Autodesk Revit Autodesk Revit Tool Box Revit Software

Your First Task When Switching To Bim Bim Engine By Archicad Architecture Details Bim Floor Plans

Revit Single Storey Intermediate 16 Roof Joining Tool Revit Architecture Roof Single

Image Result For Elevation Symbol In Floorplan Ceiling Plan Elevation How To Plan

3d Plumbing Modeling In Autodesk Revit Plumbing Bim Autodesk Revit

Growing Business With Archicad Facade Architecture Design Modern Architecture Design Architecture Portfolio Design

Getting Started Revit Products Autodesk Knowledge Network Learn Revit Learning Autodesk

Architectural Graphics 101 Wall Types Architecture Drawing Plan Interior Architecture Drawing Architecture Drawing

Wall Solid Fill With Revit Youtube

Autodesk Revit An Introduction To Schedules Bimscape Autodesk Revit Revit Tutorial Autodesk

Structural Walls Not Visible In Floor Plan Autodesk Community Revit Products

Plan Symbols Architecture Symbols Architecture Blueprints Floor Plan Symbols

Nathaniel Richards Revit Sample Architecture Details Revit Architecture Architectural Design House Plans

Ifc Properties In Labeling And Scheduling Interior Sketch Labels Property

Pin By Ana S On Homes Floor Plan Layout Floor Plans

Create Roof Trusses With Purlins In Revit Roof Trusses Roof Truss Design Roof

House Plans For India House Plan Elegant X House Plans X Feet House Plan Indian Duplex House Plans 1500 Sq Ft House Plans India House Duplex House Plans

